Building a gaming PC remains one of the most rewarding projects for any gamer willing to invest a few hours of effort. After assembling over 50 systems across every budget tier, from $500 entry-level rigs for friends’ kids to $3,000 workstations for content creators, I’ve learned that successful builds share common principles regardless of price point.
The process intimidates newcomers, but it shouldn’t. Modern PC building is more straightforward than ever. Components are designed to fit together in specific ways, making catastrophic mistakes nearly impossible if you follow basic guidelines. The real challenge isn’t the physical assembly, it’s making smart purchasing decisions that maximize performance within your budget and leave room for future upgrades.
This guide consolidates everything I’ve learned from years of building, testing, and troubleshooting gaming PCs. You’ll understand how to select components that work together harmoniously, avoid common pitfalls that waste money, and build a system that delivers excellent performance for years. Whether you’re working with $500 or $2,500, the fundamental approach remains consistent: understand your needs, research your options, and execute methodically.
Each section provides the conceptual foundation you need, with links to detailed guides covering specific topics in depth. By the end, you’ll have a complete roadmap from initial planning through first boot and beyond.
Understanding gaming PC budgets and performance tiers
Gaming PC pricing follows a predictable pattern where each tier unlocks specific capabilities. Understanding these tiers helps you set realistic expectations and allocate your budget effectively rather than overspending on components that don’t meaningfully improve your experience.
The entry tier ($500-700) delivers solid 1080p gaming at medium to high settings. Systems in this range handle esports titles at high frame rates and manage modern AAA games at playable settings. You won’t max out graphics options, but the experience is genuinely enjoyable. This tier makes sense for casual gamers, those transitioning from console, or anyone building a secondary system.
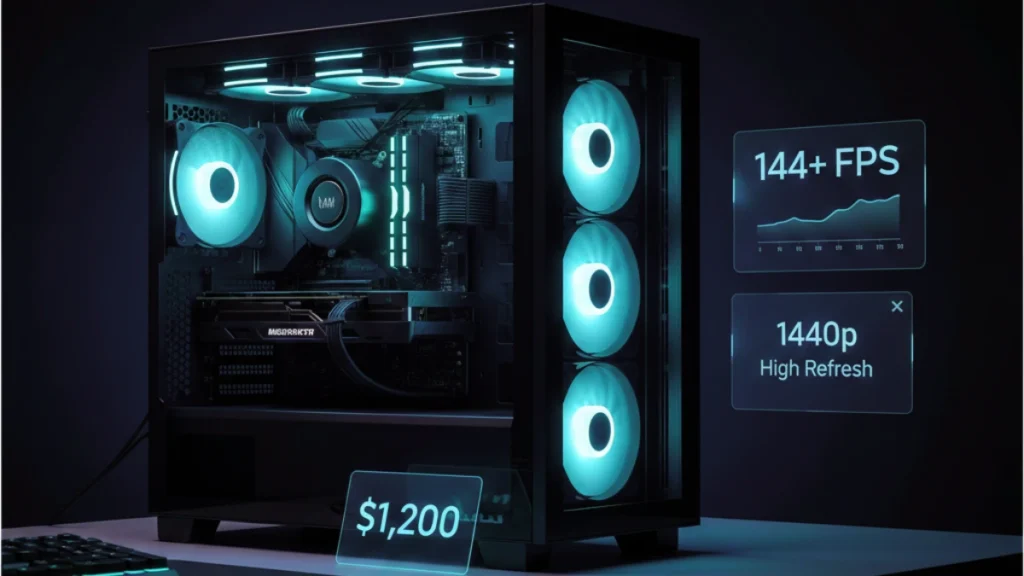
Mid-range builds ($800-1,200) hit the sweet spot for most gamers. These systems handle 1080p at maximum settings with high frame rates, and they’re capable of 1440p gaming at medium-high settings. The performance jump from entry tier is substantial, you’re playing the same games but with noticeably better visuals and smoother frame rates. Most of the builds I do for friends fall into this category.
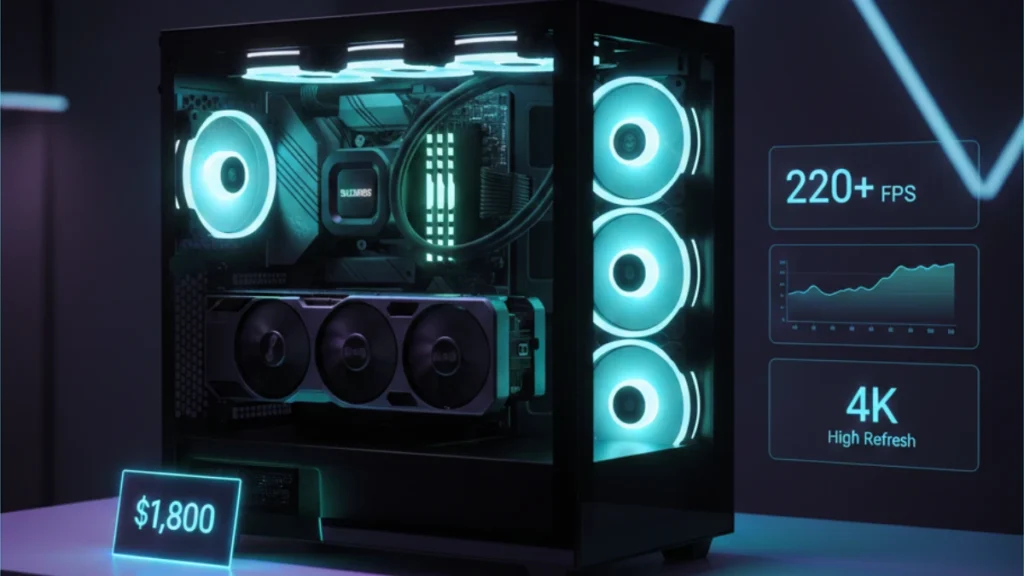
The high-performance tier ($1,300-1,800) targets 1440p at high refresh rates or entry-level 4K gaming. Components at this level represent strong price-to-performance value while delivering experiences that genuinely feel premium. Ray tracing becomes viable, high-refresh monitors get fully utilized, and demanding titles run beautifully.
Enthusiast builds ($2,000+) chase maximum performance with diminishing returns per dollar. These systems excel at 4K gaming, handle any current title at maximum settings, and provide headroom for future releases. The premium makes sense for competitive players who need every frame, content creators with specific workloads, or enthusiasts who simply want the best available.
The key insight is that doubling your budget doesn’t double your performance. A $1,500 build might deliver 60% better frame rates than a $750 build, significant but not proportional. Understanding this curve helps you find the tier that matches your expectations and budget constraints.
Essential component selection: CPU and GPU pairing
The CPU and GPU form the performance foundation of any gaming PC, and their relationship determines whether your system runs efficiently or leaves performance on the table. Mismatched components create bottlenecks where one part limits the other, wasting money you could have allocated elsewhere.
GPU priority dominates gaming builds because graphics cards handle the rendering workload that determines frame rates. At any given budget, allocating more toward the GPU typically yields better gaming performance than prioritizing the CPU. A system with a mid-range CPU and high-end GPU outperforms the inverse pairing in virtually every gaming scenario.
CPU requirements vary by resolution and game type. Higher resolutions shift more work to the GPU, reducing CPU demands. Playing at 4K, almost any modern six-core processor keeps pace with top-tier graphics cards. At 1080p with high refresh rate targets, CPU performance matters more because the GPU finishes frames faster and waits on the processor. Esports titles and strategy games tend to be more CPU-sensitive than cinematic single-player experiences.
Balanced pairing prevents bottlenecks without overspending. A Ryzen 5 7600 pairs sensibly with an RTX 4070. A Core i5-14600K matches well with an RTX 4070 Ti or RTX 4080. Jumping to a Core i9 with a mid-range GPU wastes the processor’s potential, while pairing a budget CPU with a flagship GPU leaves frames on the table at lower resolutions.
Platform considerations extend beyond raw performance. AMD’s AM5 and Intel’s LGA 1700 both offer strong options, with trade-offs in pricing, power consumption, and upgrade paths. Your choice affects motherboard options, cooler compatibility, and long-term upgrade potential.
The goal is proportional spending that maximizes gaming performance without creating imbalances. Every dollar saved by avoiding an unnecessarily powerful CPU can fund a better GPU, faster storage, or improved cooling.
Motherboard selection for gaming builds
The motherboard doesn’t directly impact gaming performance like the CPU or GPU, but it determines your system’s capabilities, upgrade potential, and long-term viability. A poorly chosen board limits what you can do today and restricts your options for years to come.
Chipset tiers define feature sets and pricing. Budget chipsets (AMD B650, Intel B760) provide everything most gamers need: adequate VRM power delivery, sufficient connectivity, and full support for mid-range to high-end CPUs. Premium chipsets (X670E, Z790) add features like additional PCIe lanes, more USB ports, and enhanced overclocking support. Unless you’re running multiple GPUs, need extensive storage expansion, or plan serious overclocking, mid-tier chipsets deliver better value.
VRM quality matters more than marketing suggests. The voltage regulator modules power your CPU, and weak VRMs throttle performance under sustained loads or limit which processors you can install. Budget boards with minimal VRM configurations handle entry-level CPUs fine but struggle with power-hungry chips like the Core i9 or Ryzen 9 series. If future CPU upgrades factor into your plans, VRM headroom deserves attention during motherboard selection.
Connectivity and expansion vary significantly between boards. Count the M.2 slots for NVMe storage, one slot fills quickly, while three provides years of expansion room. Check USB port quantity and generation on the rear I/O. Verify the board supports the RAM speeds you’re targeting. These details seem minor until you’re living with limitations daily.
Form factor affects case compatibility and build aesthetics. ATX boards offer the most expansion slots and typically the best VRMs. Micro-ATX saves space while retaining essential features. Mini-ITX enables compact builds but commands premium pricing and limits expansion. Match your motherboard form factor to your case selection and realistic expansion needs.
The motherboard is the one component you can’t upgrade without essentially rebuilding the system. Spending slightly more for quality VRMs, adequate connectivity, and a reputable brand pays dividends throughout the system’s lifespan.
Power supply sizing and selection
The power supply is the least glamorous component in any build, yet it affects system stability, noise levels, longevity, and upgrade potential. Skimping here risks damaging expensive components, while overspending wastes money that could improve actual gaming performance.
Wattage calculation starts with your GPU’s power requirements, the graphics card typically draws more than all other components combined. Add CPU power consumption, budget roughly 100W for everything else, and include 20-30% headroom for efficiency and future upgrades. A system with an RTX 4070 (200W) and Ryzen 7 (105W) runs comfortably on a 650W unit, while an RTX 4080 (320W) setup benefits from 750W or 850W.
Efficiency ratings indicate quality as much as electrical efficiency. The 80+ certification tiers (Bronze, Gold, Platinum) reflect how much power the unit wastes as heat. Gold-rated units hit the sweet spot between cost and efficiency for most builders. The rating also correlates loosely with build quality, manufacturers invest more in units they expect to certify higher.
Modular versus non-modular designs affect build experience and aesthetics. Fully modular PSUs let you connect only the cables you need, simplifying cable management and improving airflow. Semi-modular units hardwire essential cables while making others optional. Non-modular units include all cables permanently attached, creating management challenges in smaller cases. The price premium for modular designs is usually worth it.
Brand reputation matters significantly for power supplies. A failing PSU can damage other components when it dies, making reliability essential. Corsair, Seasonic, EVGA (remaining stock), and be quiet! consistently produce reliable units. Lesser-known brands often use inferior capacitors and protection circuits that increase failure risk over time.
The power supply should last through multiple system upgrades, five to ten years isn’t unusual for quality units. Investing in adequate wattage and quality construction from day one prevents headaches and additional expenses when you upgrade other components later.
Case selection and airflow planning
The case houses everything and determines thermal performance, noise levels, build difficulty, and aesthetic appeal. Unlike components that depreciate rapidly, a quality case serves multiple system generations, mine is currently on its third complete rebuild over six years.
Airflow fundamentals center on moving cool air in and hot air out efficiently. Mesh front panels allow unrestricted intake, while solid panels choke airflow regardless of how many fans you install. Modern components generate significant heat, and adequate airflow prevents thermal throttling that costs performance. Prioritize cases with mesh or perforated front panels over tempered glass fronts that sacrifice function for aesthetics.
Fan configuration follows predictable patterns. Most builds benefit from two or three intake fans on the front and one or two exhaust fans on the rear and top. This creates positive pressure that pushes air through the case while preventing dust infiltration through gaps. Cases that include fans save money, though stock fans are often louder than aftermarket options from Noctua, Arctic, or be quiet!.
Size considerations involve trade-offs between expansion capability and desk footprint. Full tower cases offer maximum room for large coolers, long GPUs, and extensive storage but dominate desk space. Mid-tower ATX cases balance size with capability and fit most builds comfortably. Compact cases enable smaller footprints but limit component compatibility and often run warmer due to restricted airflow.
Build quality manifests in details that affect your experience. Thick steel panels resist flexing and dampen vibration. Tool-less drive bays simplify storage installation. Quality cable management cutouts and tie-down points make routing cables straightforward. Removable dust filters ease maintenance. These features distinguish cases worth keeping for years from disposable enclosures you’ll replace with your next build.
The case is a long-term investment that outlasts CPUs, GPUs, and motherboards. Spending $80-120 on a quality mid-tower with proper airflow beats cycling through $50 cases every few years.
Storage configuration strategy
Storage choices affect load times, system responsiveness, and how many games you can keep installed simultaneously. The technology has evolved dramatically, and understanding your options helps allocate budget effectively between speed and capacity.
NVMe versus SATA represents the fundamental choice. NVMe drives connect directly to the motherboard via M.2 slots and deliver speeds up to 7,000 MB/s on PCIe 4.0. SATA SSDs max out around 550 MB/s regardless of the drive’s quality. For operating system and frequently played games, NVMe provides noticeably faster boot times and level loads. The price gap has narrowed enough that NVMe makes sense for most primary drives.
Capacity planning requires honest assessment of your gaming habits. A 500GB drive holds Windows and perhaps five to eight modern games, adequate for players who focus on one or two titles at a time. 1TB provides more comfortable headroom for a larger rotation. 2TB suits gamers with extensive libraries who hate uninstalling games. Modern AAA titles routinely exceed 100GB, making storage capacity a genuine quality-of-life factor.
Tiered storage strategies balance speed with cost-effective capacity. A common approach uses a fast NVMe drive (500GB-1TB) for the operating system and current games, paired with a larger SATA SSD or hard drive for media, older games, and files that don’t benefit from maximum speed. This configuration delivers premium performance where it matters while keeping costs reasonable.
DirectStorage and future considerations favor NVMe for gaming builds. Microsoft’s DirectStorage technology enables games to load assets directly from NVMe drives to the GPU, bypassing CPU bottlenecks. As more games implement this feature, the performance advantage of fast NVMe storage will grow beyond simple load time improvements.
Storage is also one of the easiest components to expand later. Starting with a modest NVMe drive and adding capacity as prices drop and needs grow often costs less than buying maximum storage upfront.
The build process: assembly and cable management
The physical assembly of a gaming PC intimidates newcomers more than it should. Components are designed to fit together in specific ways, connectors are keyed to prevent incorrect installation, and the process follows a logical sequence that becomes intuitive after your first build.
Assembly order matters for accessibility. Install the CPU, cooler, RAM, and M.2 SSD onto the motherboard before mounting it in the case. These components are easier to handle with the board on a flat surface rather than vertically mounted. Once the motherboard is secured, install the power supply, then the GPU, then connect all cables. This sequence minimizes awkward reaching and reduces the chance of damaging components.
CPU installation varies slightly between AMD and Intel but follows similar principles. AMD AM5 and older AM4 CPUs have pins on the processor that align with holes in the socket, drop it in with the alignment triangle matched and secure the retention arm. Intel’s LGA sockets have pins in the motherboard, so handle the CPU by its edges and let it settle into place before closing the retention bracket. Neither process requires force; if something resists, stop and verify alignment.
RAM seating requires more pressure than most first-time builders expect. The clips on each side must click fully into place, which requires firm, even pressure on the stick. Improperly seated RAM is the most common cause of systems that won’t POST on first boot. Push until both clips snap, partial seating causes endless troubleshooting frustration.
Cable management affects airflow, aesthetics, and future maintenance access. Route cables behind the motherboard tray whenever possible, using the cutouts to bring them to their connection points. Gather excess cable length with velcro straps or zip ties. Clean cable routing improves airflow across components and makes future upgrades less frustrating when you’re not fighting through a cable jungle.
The entire process takes three to five hours for a first-time builder, including inevitable pauses to consult guides and double-check connections.
First boot: BIOS setup and Windows installation
The moment of truth arrives when you press the power button for the first time. A successful POST (Power-On Self-Test) displays the motherboard logo and confirms your assembly work. If the system doesn’t POST, systematic troubleshooting identifies the issue, usually something simple like unseated RAM or a forgotten power connection.
BIOS configuration establishes the foundation for system performance. Enter the BIOS by pressing the designated key during startup (typically Delete, F2, or F12 depending on manufacturer). The essential first step is enabling XMP (Intel) or DOCP/EXPO (AMD) to run your RAM at its rated speed. Without this setting, memory defaults to base JEDEC specifications far below what you paid for. A DDR5-6000 kit runs at 4800 MHz until you enable the profile, a significant performance loss.
Boot order configuration tells the system where to find the operating system. Set your NVMe or primary SSD as the first boot device. If you’re installing Windows from a USB drive, temporarily prioritize USB booting, then change back after installation completes. Modern UEFI interfaces make this straightforward with visual drag-and-drop boot priority lists.
Windows installation proceeds smoothly with a prepared USB drive containing the installation media. Microsoft’s Media Creation Tool builds bootable installers from any working PC. During installation, delete all existing partitions on your target drive to ensure a clean setup, let Windows create its required partitions automatically, and follow the prompts. The entire process takes 15-30 minutes depending on drive speed.
Post-installation priorities include installing GPU drivers directly from NVIDIA or AMD rather than relying on Windows Update, enabling Game Mode in Windows settings, and configuring power plans for performance. Resist the urge to install optimization utilities that promise performance gains, most create more problems than they solve. A clean Windows installation with current drivers outperforms a cluttered system full of “optimization” software.
Pre-build planning: compatibility and sourcing
Successful builds start long before you touch hardware. Planning ensures components work together, fit physically in your case, and arrive at prices that respect your budget. Skipping this phase leads to expensive mistakes, incompatible parts, clearance issues, and overpaying for components available cheaper elsewhere.
Compatibility verification prevents the most frustrating build problems. CPU and motherboard socket must match exactly, an AMD Ryzen 7000 series requires AM5, while Intel 14th gen needs LGA 1700. RAM generation must match your platform, DDR4 motherboards cannot accept DDR5 memory and vice versa. GPU length must fit your case, and CPU cooler height must clear your side panel. These seem obvious in isolation, but overlooking one detail derails entire builds.
PCPartPicker serves as the essential planning tool for builders. The site automatically flags compatibility issues, tracks prices across retailers, and estimates total system power draw. Building your parts list there before purchasing catches problems like oversized coolers, insufficient PSU wattage, or motherboards lacking features you assumed were standard. The few minutes spent planning saves hours of troubleshooting or return shipping.
Retailer selection significantly impacts total build cost. Amazon offers convenience and easy returns. Newegg provides combo deals and component-specific sales. B&H Photo often beats competitors on GPUs and monitors while offering tax advantages for many states. Micro Center’s in-store pricing undercuts online retailers substantially for CPUs and bundled purchases. Checking multiple sources for each component routinely saves $100-200 across a complete build.
Timing purchases around sales cycles stretches budgets further. Black Friday, Prime Day, and back-to-school periods offer predictable discounts. Setting price alerts through PCPartPicker notifies you when components hit target prices. Patience frequently rewards builders with the same parts for 15-25% less than impulse purchasing at full retail.
Long-term strategy: future-proofing and upgrades
A well-planned gaming PC delivers strong performance for four to five years before requiring significant upgrades, and remains usable even longer with modest adjustments. Achieving this longevity requires strategic thinking during initial planning and realistic expectations about how technology evolves.
Future-proofing misconceptions lead to overspending. Buying the most expensive GPU available today doesn’t prevent it from becoming mid-range within three years, that’s simply how the market moves. True future-proofing means investing in platform longevity, adequate power supply headroom, and quality cases that outlast multiple component generations. These decisions extend useful system life without wasting money on rapidly depreciating parts.
Platform selection determines upgrade runway more than any other factor. AMD’s AM5 platform promises CPU support through at least 2027, meaning a motherboard purchased today accepts multiple future processor generations. Quality power supplies with adequate wattage handle GPU upgrades without replacement. Cases with good airflow and standard form factors house whatever components you install for years to come. These foundational choices enable meaningful upgrades without rebuilding entire systems.
Knowing when to upgrade versus rebuild saves money and frustration. A system with a capable platform and one clear bottleneck benefits from targeted upgrades, swap the GPU, add RAM, or install faster storage. A system with an obsolete platform requiring multiple component changes to achieve acceptable performance is rebuild territory. The distinction matters because piecemeal upgrades to dying platforms waste money that would serve better in a coherent new build.
Upgrade prioritization follows predictable patterns for gaming systems. GPU upgrades deliver the most noticeable gaming improvements. CPU upgrades matter when the processor genuinely bottlenecks your graphics card. RAM upgrades from 16GB to 32GB provide headroom for modern titles and multitasking. Storage additions improve quality of life without affecting frame rates. Understanding this hierarchy helps allocate upgrade budgets effectively.
Frequently asked questions
How much should I spend on a gaming PC in 2026?
Budget depends on your performance targets. $500-750 delivers solid 1080p gaming. $800-1,300 handles 1080p at high refresh rates or 1440p at medium-high settings. $1,400-2,000 targets 1440p at high refresh rates. $2,200+ pursues 4K gaming or maximum performance. Most gamers find the $1,000-1,600 range offers the best balance of performance and value.
Is building a PC actually cheaper than buying pre-built?
Usually, but the gap varies by price point and market conditions. Budget builds ($500-800) show the largest savings from DIY. Mid-range builds sometimes match pre-built pricing within $50-100. High-end builds favor custom again due to markup on premium components. Factor in your time value and comfort with troubleshooting when deciding.
What’s the most common mistake first-time builders make?
Improperly seated RAM causes most first-boot failures. The memory sticks require firm, even pressure until both retention clips snap into place. Many new builders stop pushing before the RAM fully seats, leading to systems that won’t POST. Other common issues include forgetting the CPU power connector and not enabling XMP in BIOS.
How long will my gaming PC last before needing upgrades?
A well-built system delivers strong performance for four to five years before requiring significant upgrades. You’ll likely want a GPU upgrade first as new titles become more demanding. CPU upgrades become relevant when the processor bottlenecks your graphics card. With strategic upgrades, the core platform can remain viable for six to seven years.
Should I buy all components at once or wait for sales?
Buying everything within a short window (two to four weeks) ensures compatibility with current stock and simplifies returns if something arrives defective. Setting price alerts and purchasing components as they hit target prices works if you’re patient. Avoid spreading purchases over months, component generations change, and holding a CPU while waiting for GPU sales risks compatibility issues.
Do I need Windows 11 for gaming, or is Windows 10 fine?
Both operating systems deliver comparable gaming performance in most titles. Windows 11 offers DirectStorage support and some scheduler improvements for newer CPUs. Windows 10 remains fully supported and runs all current games. If you’re building new, Windows 11 makes sense for long-term support. Existing Windows 10 systems don’t require immediate upgrades.
How important is RGB lighting for a gaming PC?
RGB has zero impact on performance, it’s purely aesthetic preference. RGB components typically cost $10-30 more than non-RGB equivalents. If budget is tight, skip RGB and allocate that money toward better core components. If aesthetics matter to you and budget allows, RGB adds personalization without functional downside.
Building a gaming PC rewards you with better performance per dollar, complete control over component selection, and knowledge that serves every future upgrade and troubleshooting scenario. The process seems intimidating from the outside but becomes straightforward once you understand how components work together.
Start with realistic budget expectations and performance targets. Select components that balance current needs with future upgrade potential. Plan thoroughly using compatibility tools before purchasing. Execute the build methodically, and don’t rush the cable management that affects both thermals and aesthetics. Configure your BIOS properly, install clean drivers, and enjoy the system you built with your own hands.
Every builder starts somewhere. My first build took an entire weekend and involved multiple trips to Micro Center for parts I’d forgotten. Now I can assemble a system in under two hours. That progression happens naturally with experience.
Ready to start planning your build? Explore the budget-specific guides linked throughout this article, use PCPartPicker to verify compatibility, and join the community of builders who’ve discovered that the best gaming PC is the one you build yourself.