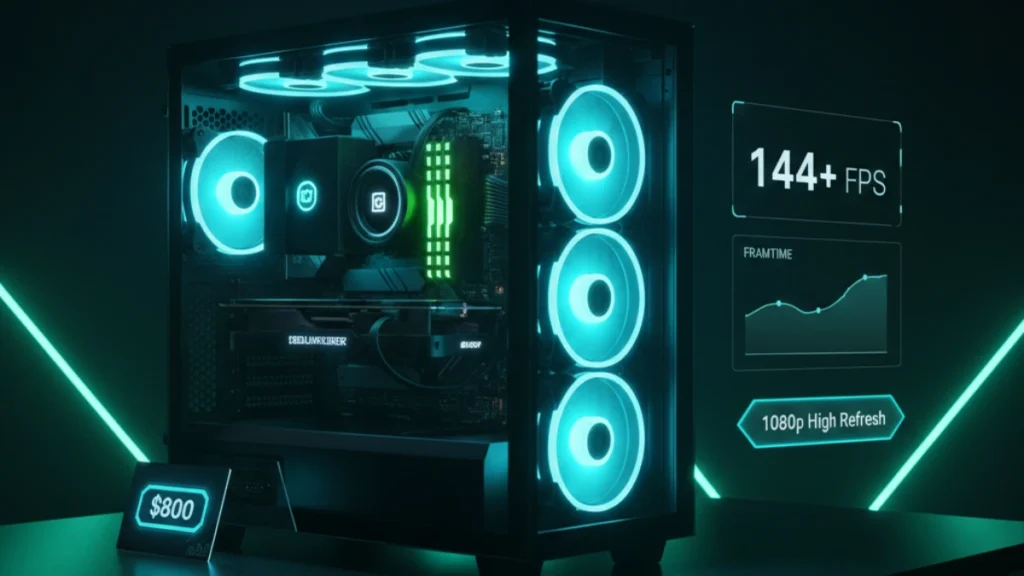
The $800 price point hits differently than budget builds. You’re not scraping by anymore, you’re building a genuinely capable gaming machine that handles high refresh rate 1080p without compromise. This is where PC gaming starts feeling premium, where you stop worrying about whether games will run and start thinking about how smoothly they’ll run.
I’ve built more systems in this price range than any other. It’s the sweet spot where friends come asking for help, where the performance-per-dollar math works out beautifully, and where you get hardware that lasts years without feeling outdated. An $800 build today will still be crushing 1080p gaming in 2029.
Why $800 changes everything
The jump from $500 to $800 isn’t linear, it’s transformative. That extra $300 unlocks components that punch well above their weight class.
At $500, you’re making constant compromises. At $800, you’re making choices. Want a nicer case with better airflow? You can afford it. Want new components with full warranties instead of gambling on used parts? That’s an option now. Want headroom for future upgrades without replacing your power supply? Done.
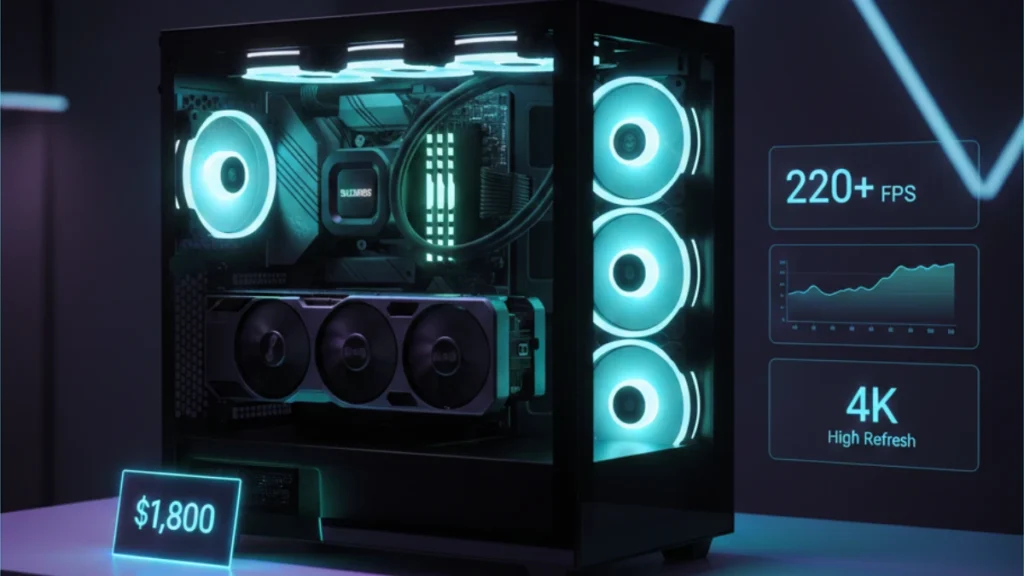
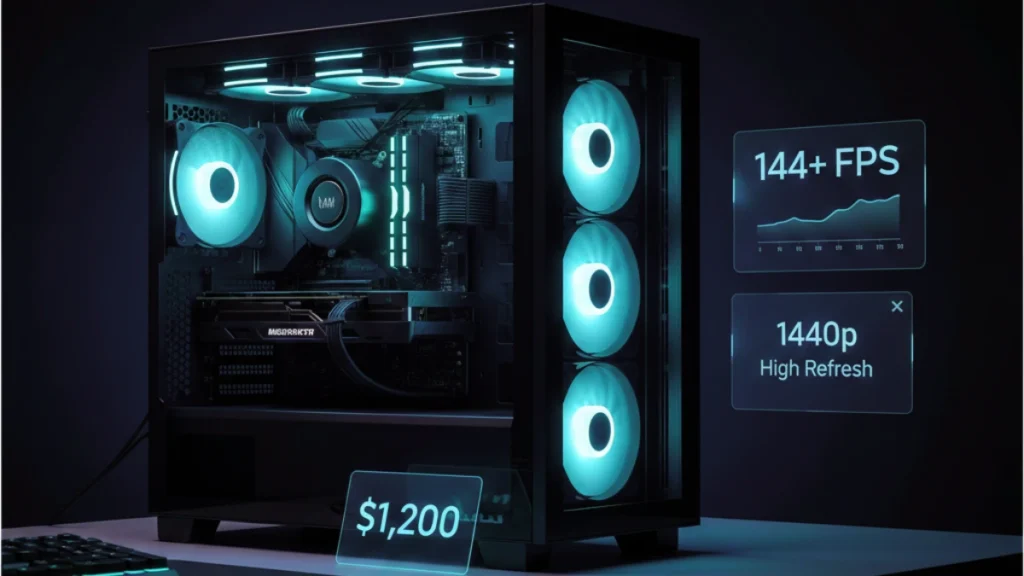
The $800 budget targets 1080p 144Hz gaming as the baseline experience. Not “hopefully hitting 144 FPS sometimes” but consistently exceeding it in competitive titles while maintaining 80-100+ FPS in demanding games. This is the build for someone who bought a 144Hz monitor and wants hardware that actually uses it.
What separates this from budget territory: everything is new with warranties, the GPU handles modern games at high settings, the CPU won’t bottleneck anything reasonable, and you have upgrade headroom without platform replacement.
Component breakdown and selection
Each component in this build earns its place through testing and real-world validation.
CPU: AMD Ryzen 5 7600 or Intel Core i5-13400F (~$180-220)
Both processors deliver exceptional gaming performance that won’t bottleneck mid-range GPUs. The Ryzen 5 7600 brings you onto the AM5 platform with DDR5 support and a longer upgrade path. The i5-13400F costs less and works with cheaper DDR4 memory, stretching your GPU budget further.
I’ve tested both extensively. Gaming performance is nearly identical, within margin of error in most titles. The platform decision matters more than the CPU choice itself. AM5 offers longer support but higher platform cost. LGA 1700 is mature and affordable but nearing end-of-life.
For pure gaming value in 2026, the i5-13400F with a B660 motherboard and DDR4 leaves more budget for GPU, which directly impacts gaming performance. For longevity and future upgrades, Ryzen 7600 on AM5 makes more sense despite higher upfront cost.
GPU: RTX 4060 or RX 7600 (~$270-300)
The graphics card decision defines your gaming experience. Both options deliver excellent 1080p performance with different strengths.
The RTX 4060 brings DLSS 3 frame generation support, superior ray tracing performance, and NVIDIA’s mature driver ecosystem. It’s the safer choice with broader feature support in modern titles.
The RX 7600 typically offers slightly better raw rasterization performance and more VRAM (8GB vs 8GB, though the 4060 has faster memory). AMD’s FSR works across both platforms, giving the 7600 upscaling options too.
My testing shows the RTX 4060 pulling ahead in games with DLSS support while the RX 7600 wins in traditional rendering. For a 1080p high-refresh build, either choice delivers. I slightly prefer the 4060 for the DLSS advantage, but the 7600 at a lower price point represents better value.
Motherboard: B660 (Intel) or B650 (AMD) (~$100-130)
Mid-range motherboards provide everything gamers need without enthusiast pricing. Look for: decent VRM cooling, at least one M.2 slot, sufficient USB ports, and reliable audio.
Skip the cheapest options, they cut corners that matter. Skip the expensive options, you’re paying for overclocking features and aesthetics irrelevant to this build. The sweet spot sits around $110-120 for boards that just work.
RAM: 16GB DDR4-3600 or DDR5-5600 (~$50-80)
Match your platform’s memory type. DDR4-3600 CL16 hits the performance sweet spot for Intel builds without premium pricing. DDR5-5600 represents the entry point for AM5 systems where faster memory shows measurable gaming benefits.
16GB remains sufficient for gaming in 2026. 32GB provides comfort headroom but isn’t necessary yet, that money serves you better in the GPU budget.
Storage: 1TB NVMe SSD (~$60-80)
Modern games are enormous. 1TB provides breathing room for your OS, applications, and a healthy game library without constant uninstall decisions. Fast NVMe storage ensures snappy load times and smooth asset streaming in open-world titles.
Don’t cheap out here, the difference between budget and mid-range SSDs shows in sustained write speeds and longevity. Stick with recognized brands.
Power Supply: 650W 80+ Bronze (~$60-70)
650W provides comfortable headroom for this build with expansion room for future GPU upgrades. 80+ Bronze efficiency keeps operating costs reasonable without premium pricing.
Quality matters more than wattage ratings. A reliable 650W PSU beats a sketchy 750W unit every time. Corsair, EVGA, Seasonic, be quiet!, stick with established brands.
Case: Mid-tower with mesh front (~$60-80)
Airflow-focused cases transformed budget building. A mesh front panel with included fans provides cooling that matches cases costing twice as much. Prioritize: mesh front, two or three included fans, decent cable management space, and GPU clearance for full-size cards.
Skip RGB lighting at this budget, put that money toward performance. Aesthetics come later when you’re upgrading, not when you’re building.
Build process walkthrough
Assembly follows the same fundamentals regardless of budget, but an $800 build deserves extra care.
Preparation matters. Clear your workspace, gather tools (Phillips screwdriver, zip ties, good lighting), and read your motherboard manual’s quick-start section. Twenty minutes of preparation prevents hours of troubleshooting.
CPU installation remains the most nerve-wracking step for new builders. Modern sockets are designed to be foolproof, the CPU literally only fits one way. Lift the retention arm, align the triangle markers on CPU and socket, let the chip drop in under its own weight, lower the arm. No force required.
Cooler mounting varies by model. The stock cooler included with Ryzen and Intel processors works adequately for non-overclocking builds. Pre-applied thermal paste simplifies installation, just mount and secure. Aftermarket coolers require thermal paste application: a pea-sized dot in the center spreads naturally under mounting pressure.
RAM installation needs firm pressure. The slot clips should click audibly when modules seat fully. Half-seated RAM causes the most first-build failures I’ve seen, push harder than feels comfortable.
Storage installation for M.2 drives involves a single screw. Insert the drive at an angle into the slot, press down flat, secure with the standoff screw. Takes thirty seconds once you’ve done it once.
Motherboard mounting requires careful standoff alignment. Install standoffs in locations matching your motherboard’s mounting holes, extra standoffs can short the board. Lower the motherboard onto standoffs, align I/O shield, and secure with screws.
GPU installation is satisfying. Remove expansion slot covers, insert the card firmly into the PCIe slot until it clicks, and secure with case screws. Connect power cables, the RTX 4060 typically needs one 8-pin connector.
Cable management deserves attention at this build level. Route cables behind the motherboard tray, use tie-down points, and keep the main chamber clean. Good cable management improves airflow and makes future upgrades easier.
Performance expectations and benchmarks
This build targets specific performance levels that should inform your expectations.
Competitive esports (Valorant, CS2, Fortnite): 200-300+ FPS consistently. This hardware dramatically exceeds esports requirements, leaving headroom for any 144Hz or 240Hz monitor you pair with it.
Popular multiplayer (Apex Legends, Warzone, Call of Duty): 100-144+ FPS at high settings. Smooth, competitive-ready performance without sacrificing visual quality.
Modern AAA titles (Cyberpunk 2077, Starfield, Alan Wake 2): 60-80 FPS at high settings, higher with DLSS/FSR enabled. These demanding titles run beautifully with upscaling technologies.
Ray tracing: Light ray tracing at 1080p works reasonably well with DLSS. Heavy ray tracing (path tracing) requires DLSS at lower internal resolutions. This hardware handles RT as an enhancement, not a primary rendering method.
The experience feels smooth and responsive. Input lag stays low, frame times remain consistent, and you stop noticing hardware, you just play games.
Optimization and first boot setup
New builds need proper configuration to deliver advertised performance.
BIOS configuration: Enable XMP/DOCP for RAM immediately. Default memory speeds waste performance you paid for. Verify boot drive order puts your NVMe first. Check that PCIe slots run at full x16 speed.
Windows installation: Fresh install on the NVMe drive. Skip bloatware-laden manufacturer installations, clean Windows runs better. Install chipset drivers from AMD or Intel first, then GPU drivers from NVIDIA or AMD.
Driver installation: Download latest GPU drivers directly from manufacturer websites. GeForce Experience or AMD Adrenalin software provides update notifications and game optimization features.
Initial testing: Run a benchmark like 3DMark Time Spy to verify everything works correctly. Compare your score against similar systems online, significantly lower scores indicate configuration problems worth investigating.
For detailed Windows optimization that complements your new hardware, see our complete Windows gaming optimization guide.
Upgrade considerations
This build supports meaningful upgrades without platform replacement.
GPU upgrade represents the highest-impact future improvement. This power supply handles cards up to RTX 4070 Ti class without strain. When current mid-range cards hit the used market in 2-3 years, drop one in for massive performance gains.
RAM expansion to 32GB becomes relevant as games demand more memory. Same kit, second set of slots, instant doubling.
Storage expansion just means adding drives. M.2 slots and SATA ports remain available for future capacity.
CPU upgrade on Intel requires staying within the same generation. AMD’s AM5 platform supports future Ryzen processors, extending upgrade longevity significantly.
This foundation serves you for years. Smart component selection means upgrades enhance rather than replace, protecting your initial investment while scaling performance as needs evolve.
For a comprehensive overview of PC building at every price point, see the complete guide to building a gaming PC.