I remember my first stream like it was yesterday, and not in a good way. Black screen, no audio, my webcam showing up sideways, and about fifteen confused viewers watching me fumble through settings for twenty minutes. That disaster taught me something valuable: OBS Studio is incredibly powerful, but only if you set it up correctly from the start.
After three years of streaming and helping dozens of friends in Austin’s gaming community get their setups running, I’ve refined my OBS configuration process down to a science. This guide walks you through everything from installation to your first successful stream, skipping the unnecessary complexity that trips up most beginners.
Why use OBS Studio instead of Streamlabs?
OBS Studio remains the gold standard for streaming software, and there’s a reason it powers most professional streams you watch on Twitch and YouTube. It’s completely free, open-source, and receives regular updates from a dedicated development team. Unlike some alternatives that lock features behind subscriptions, OBS gives you everything upfront.
The learning curve is steeper than drag-and-drop solutions, but that investment pays off. Once you understand how OBS works, you’ll have complete control over every aspect of your stream. I’ve tested Streamlabs, XSplit, and several other options over the years, and I keep coming back to vanilla OBS for its stability and performance efficiency. If you’re unsure whether OBS Studio is right for you, the Streamlabs vs OBS Studio comparison breaks down the differences to help you choose.
The software runs lighter than most alternatives too. On my Ryzen 7 7800X3D system, OBS typically uses 2-4% CPU when streaming with NVENC encoding, while some competing software sits at 8-12% doing the same job.
How do you install and set up OBS Studio?
Head to obsproject.com and download the installer for your operating system. Windows users should grab the 64-bit version unless you’re running ancient hardware. Run the installer with default settings, there’s no bloatware or unwanted extras bundled in.
When you first launch OBS, the Auto-Configuration Wizard pops up. Here’s my honest take: skip it. The wizard makes assumptions about your hardware and internet connection that often result in suboptimal settings. I’ve seen it recommend 720p30 streaming on systems capable of 1080p60 without breaking a sweat.
Instead, close the wizard and let’s configure everything manually. This takes an extra ten minutes but gives you a setup tailored to your actual hardware.
What are the main parts of the OBS Studio interface?
OBS organizes everything into scenes and sources. Think of scenes as different camera angles or layouts you can switch between during your stream. Sources are the individual elements within each scene: your game capture, webcam, overlays, and audio inputs.
The main window shows five key areas: the preview (what your stream looks like), scenes panel (bottom left), sources panel (bottom center), audio mixer (bottom right), and controls (far right). The controls section contains Start Streaming, Start Recording, and Settings buttons you’ll use constantly.
Before touching anything else, click Settings in the bottom right corner. This opens the configuration panel where most of the magic happens.
What are the best OBS output settings for streaming?
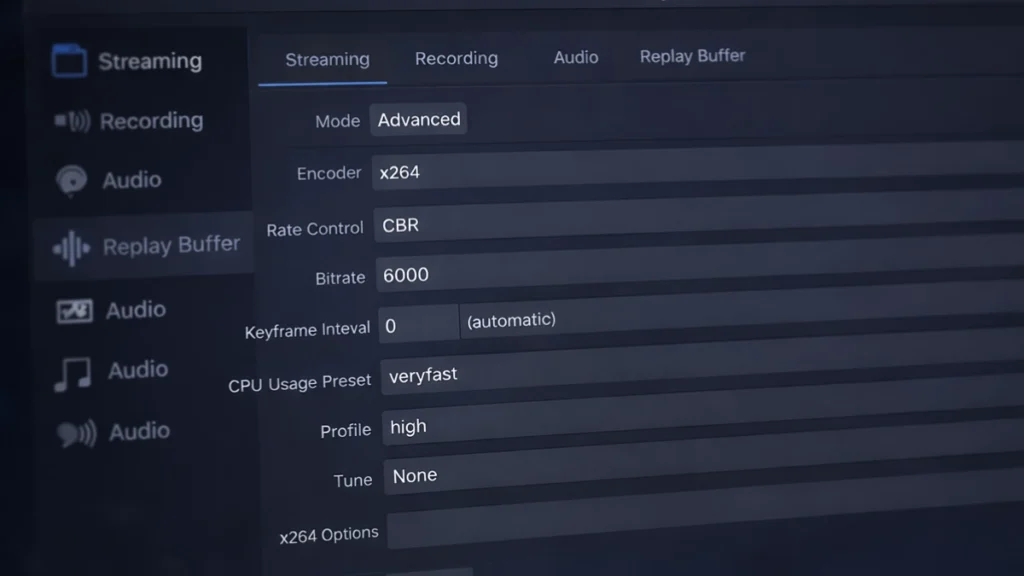
Navigate to the Output tab and switch the Output Mode dropdown from Simple to Advanced. Simple mode hides too many important options that affect stream quality.
Under the Streaming tab within Output, you’ll configure your encoder. If you have an NVIDIA GPU (GTX 1650 or newer), select “NVIDIA NVENC H.264 (new)” from the encoder dropdown. AMD users should choose “AMD HW H.264 (AVC).” Intel users with recent integrated graphics can use QuickSync. These hardware encoders offload the work from your CPU, leaving more processing power for your games.
For Rate Control, select CBR (Constant Bitrate). This maintains consistent quality throughout your stream and plays nicely with Twitch and YouTube’s servers.
Bitrate depends on your upload speed and target resolution. For 1080p60 streaming, I recommend 6000 Kbps as your starting point, this is Twitch’s maximum for non-partners anyway. If you’re targeting 720p60, drop to 4500 Kbps. Your upload speed needs to be at least 50% higher than your bitrate to account for fluctuations, so 1080p60 streaming requires roughly 9+ Mbps stable upload.
Set Keyframe Interval to 2 seconds. Preset should be “Quality” for most users, though “Max Quality” works if your GPU isn’t being taxed heavily during gameplay. Profile stays at “high” and Look-ahead plus Psycho Visual Tuning both get enabled.
What video resolution and FPS should you use in OBS?
The Video tab controls your resolution and frame rate. Base (Canvas) Resolution should match your monitor’s native resolution, for most gaming setups, that’s 1920×1080 or 2560×1440.
Output (Scaled) Resolution is what your stream actually broadcasts. I run my canvas at 2560×1440 but scale down to 1920×1080 for streaming. This downscaling actually improves image quality because you’re essentially supersampling.
Downscale Filter matters more than people realize. Lanczos produces the sharpest results but requires slightly more processing. For most setups, Lanczos (Sharpened scaling, 36 samples) is the right choice. Only switch to Bicubic if you notice performance issues.
Common FPS Values should be 60 for gaming content. Some streamers still run 30fps to save bandwidth, but modern viewers expect smooth motion today.
How do you create your first scene in OBS Studio?
Back on the main screen, your Scenes panel probably shows one default scene. Right-click it and rename it to something descriptive like “Gaming” or “Main.”
Now you need sources. Click the + button under Sources and select “Game Capture” for capturing your gameplay. Mode should be “Capture specific window” once your game is running, though “Capture any fullscreen application” works for testing.
If Game Capture shows a black screen (incredibly common), try these fixes in order: run OBS as administrator, disable Windows Game Mode, or switch to “Display Capture” temporarily. Display Capture grabs your entire monitor and uses slightly more resources, but it’s more reliable for troubleshooting.
For your webcam, add a “Video Capture Device” source and select your camera from the dropdown. Position and resize it by clicking and dragging in the preview window. Most streamers place their facecam in a corner where it won’t cover important game UI elements.
How do you set up audio in OBS Studio?
OBS’s audio mixer shows all your audio sources with individual volume sliders. By default, you’ll see Desktop Audio (your game and system sounds) and Mic/Aux (your microphone).
Click the gear icon next to your microphone and select Filters. Add a Noise Suppression filter first, I use RNNoise for AI-powered noise removal that handles keyboard clicks and background noise effectively. Next, add a Noise Gate to cut audio when you’re not speaking. Set Close Threshold around -32 dB and Open Threshold around -26 dB, then adjust based on your environment.
A Compressor filter helps even out your volume levels so you don’t blast viewers when you get excited. I use a 3:1 ratio with -18 dB threshold, 6ms attack, and 60ms release. These settings catch sudden peaks without making your voice sound squashed.
Your desktop audio and microphone should sit at different levels in the mixer. Game audio around -20 dB to -15 dB and your voice peaking between -10 dB and -6 dB keeps you audible without drowning out gameplay. The meters in OBS turn yellow in the safe zone and red when clipping, stay out of the red.
How do you connect OBS to Twitch or YouTube?
Under Settings > Stream, select your platform from the Service dropdown. Twitch, YouTube, and Facebook Gaming all have direct integration.
Click “Connect Account” to link your streaming account through OAuth, or manually paste your stream key if you prefer. The stream key lives in your platform’s creator dashboard. Twitch puts it under Settings > Stream, YouTube has it in YouTube Studio under Go Live.
Keep your stream key private. Anyone with this key can stream to your channel, and recovering from a leaked key means resetting it and updating every application that uses it.
What should you check before going live in OBS?
Before your first real stream, do a test broadcast. Twitch has a “Bandwidth Test” server option that lets you stream without going public. YouTube offers unlisted streams for testing. Stream for five minutes, check your stats for dropped frames, and watch the VOD to verify audio and video quality.
OBS shows your streaming status in the bottom bar. Green means everything’s healthy. Yellow indicates minor issues like elevated encoding time. Red means dropped frames, something’s wrong with your connection or encoding settings.
My first test stream revealed my microphone was picking up my mechanical keyboard clear as day, my game capture had a 200ms delay compared to my webcam, and my bitrate was too aggressive for my upload speed. Finding these issues in testing saved me from a disastrous public debut.
Which OBS Studio hotkeys should every streamer set up?
Navigate to Settings > Hotkeys and set up keyboard shortcuts for common actions. At minimum, configure hotkeys for Start/Stop Streaming, Mute/Unmute Microphone, and switching between scenes.
I use F1-F4 for scene switching, F5 to toggle my microphone mute, and Pause/Break to start and stop streaming. Choose keys you won’t accidentally hit during gameplay, nothing ruins a stream faster than accidentally going offline during an intense moment.
How do you improve your OBS Studio setup over time?
This baseline configuration gets you streaming with solid quality and stable performance. Once you’re comfortable with the basics, you’ll want to explore stream overlays and alerts, advanced audio routing with Voicemeeter, and scene transitions that make your stream look more professional.
The best advice I can give is to start simple. I’ve seen too many new streamers spend weeks perfecting elaborate multi-scene setups before ever going live, then burning out without broadcasting a single stream. Get the fundamentals working, go live a few times, and iterate based on what you actually need.
Your setup doesn’t need to be perfect on day one. My current OBS configuration looks nothing like what I started with three years ago, and it’ll probably look different again next year. The important thing is getting started. With OBS Studio configured properly, you’re ready to start streaming. This is just the beginning. For advanced optimization, encoding strategies, and platform-specific settings, see the complete streaming setup and optimization guide.